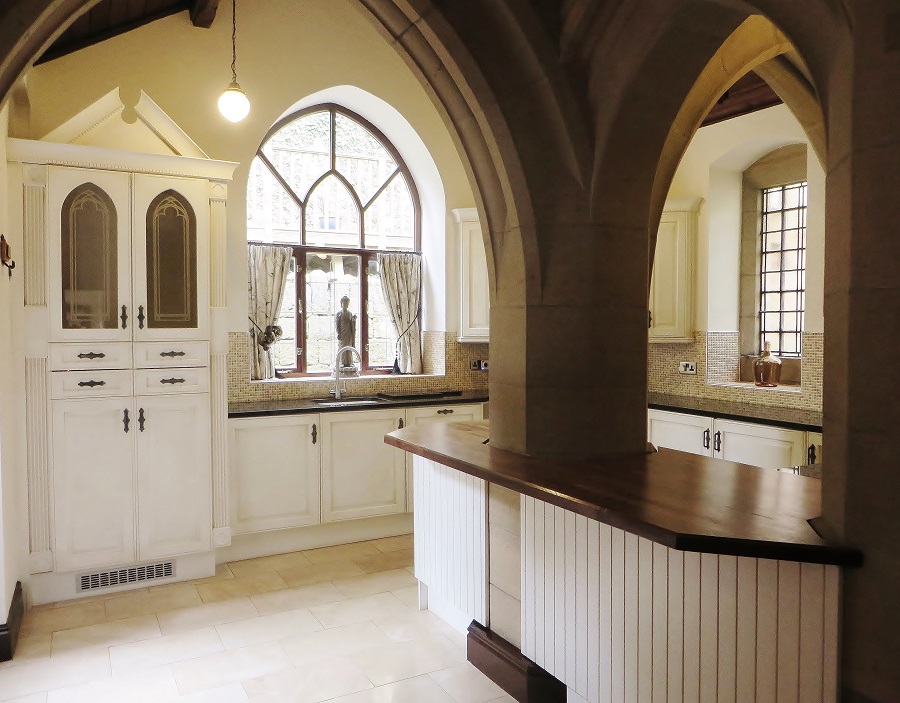
I undertook this kitchen painting project in Rawdon, Leeds. This house was truly unique, a converted chapel that retained many of its original features, among which were stone archways, wooden ceilings, corbels and hidden niches.
Client Testimonial
When we bought our house 6 years ago the kitchen was key to our decision to buy. The design, layout and worktops were everything we wanted. However, over the years we noticed the colour of the cupboards were getting darker and eventually the kitchen looked like it belonged to a family of heavy smokers (which we are not.) After researching on the internet we found Lee….
After an initial consultation we discovered the kitchen had been subject to a previous repaint and the paint used was not suitable hence the discolouration. Lee give us solid advise on colours and was prepared to revisit for consultations as many times as we needed to get the colour right. We waited 10 months and it was worth every second. The end result is beyond expectations.
Lee kept us fully informed of what to expect during the re-paint process. There was no dust or mess and the process which took three weeks was relatively easy for us. Having Lee in our home was a pleasure. He is good company and hardworking.
As a final bonus to having a beautiful kitchen we lost 10lbs each through having to live on healthy microwave meals and no snacks” Mrs M, Rawdon, Leeds, West Yorkshire
The Project

The kitchen, like the house, was a one off, bespoke, hand made and pretty Gothic in design. The clients contacted me wanting a specialist kitchen painter to update their cabinets as the original colour was looking distinctly yellow and had darkened with age. This was in large part to an inferior varnish having been applied originally. Though hard to see on the ‘before’ pictures above, the paint finish had also not been particularly well done and certainly wasn’t making the most of the Gothic detailing.
They initially contacted me by phone and after discussing some of the main points I asked if it would be possible to email me a few images so I could compile an estimate and email it back by return. A couple of days later I received an email saying they were very happy with everything I proposed and would I able to visit them for a consultation. Naturally I was very happy to do so 🙂
During the consultation we discussed the process and logistics in more detail and also delved into colour options. As this kitchen was going to have a subtle ‘antique’ paint finish the colours we looked at would be the base and not the finished shade. The antiquing effect would change and darken the base so the colours we initially looked at were pretty light – The Little Greene Company’s ‘Slaked Lime (105)’ and ‘Slaked Lime -Mid (149)’ .
I painted up a couple of samples, bobbed them in the post and waited to see how the client thought they looked after living with them for a while. After a couple of months of moving the samples about and looking at them in different lights she was still unsure so we arranged a second visit and another colour consultation.
The ‘Slaked Limes’ were looking a bit cool in some lights so armed with an antique paint effect sample done on a warmer, brighter base I headed off to see them.
One look at the new sample in situe and we knew it was perfect – a light bright base with warm yet earthy antique finish, perfect! Decision made, a base colour of Dulux’s Jasmine White with a raw umber/paynes grey and burnt umber glaze – lovely.
The main reason this kitchen was not just re-painted in a solid single colour was that it would have looked quite stark and a bit incongruous among the stone archways and other features.
The kitchen needed to look as if it belonged there, had always been there and was almost a natural feature unto itself. It didn’t need the full on ‘distressed’ treatment as this would have made it look too beaten up and old. It needed to look aged but still remain sharp and stylised, which a subtle ‘antique’ paint effect would achieve perfectly, not only softening the look of the units but also enhancing all their lovely detailing.
The Kitchen Painting Process

To processes required to create a hand painted kitchen with a specialist paint effect can essentially be broken down into two main stages – the base painting of the units and the creation of the paint effect itself.
In many of my other blogs I have explained the process and materials I use for preparing and hand painting a kitchen, so for this Blog I thought I’d focus a little more on the creation of the paint effect finish.
Before the paint effect is created however, the perfect base needs to be achieved. You are essentially painting the kitchen in a single colour just like you would do for a normal hand painted kitchen re-paint. The only difference is you don’t stop there, you create the paint effect finish over the top and then lacquer it to achieve the finished result.

Pre-Paint Effect Preparation & Painting
Stage 1 –
Remove handles and thoroughly clean everything with a good cleaner/degreaser
Stage 2 –
Mask everything off. I mask off the floors, worktops, walls and other areas with 1200 lining paper and various tapes. Different masking tapes have different properties and I typically use 3-4 different types when masking off the different areas of a kitchen.

Stage 3 –
Remove doors and stack. To make this as easy and efficient as possible I used my wonderful * Erecta Rack.
Stage 4 –
Thoroughly sand every square inch of the areas to be painted. As usual I used my trusty Festool RTS 400 Q-Plus GB 240V Orbital Sander (which allows for virtually dust free sanding) with Granat 120 pads and Mirka Golf Flex.
Stage 5 –
Hoover off & tack cloth any residual dust and then apply the first coat of primer.
Stage 6 –
Sand back the primer until perfectly smooth, remove any dust and then fill/caulk any areas that need attention.

Stage 7 –
Apply a second coat of primer to ensure a brilliantly durable and scratch proof base.
Stage 8 –
Apply the top coats, sanding between coats. I applied two coats of oil eggshell which I also had tinted by Holmans to the equivalent of Dulux’s ‘Jasmine White’.
So after all the thorough preparation and painting I ended up with the beautiful, brush mark free finish you see here ( I re-attached some handles for the full effect). Most kitchen projects stop there, but not this one, oh no there was more to come!

The ‘Antique’ Paint Effect
As I mentioned above, the idea behind creating an aged or antiqued paint effect for this kitchen was to make it look like it naturally belonged there and fitted beautifully into its surroundings. Also, the effect would enhance and ‘bring out’ all the lovely detailing.
To create most paint effects you need a tinted glaze. By this I mean a mixture of scumble glaze and paint. The scumble glaze makes the paint semi transparent and also increases the open time so you can play and get the exact finish you want. In days gone by Ratcliffes Oil Glaze was the glaze of choice but with the introduction of new VOC laws and various other reasons this wonderful and much missed product is no longer available. They did bring out a replacement but in my opinion it is truly woeful.

I spent many many many hours in my workshop working out the best chemical composition to create my own glaze after the original ratcliffes was discontinued, and though I was eventually successful it was pretty messy to make and a bit time consuming. Now however there is a new kid on the block and, having used it for a while now, I can honestly say it’s as good, if not better than the original Ratcliffes. It’s Polyvine Oil Glaze, yay 🙂
As you can see from the photos the effect I created is subtle, fading in and out but is definitely noticeable without being over the top. It also looks natural, like the kitchen and paint has just aged over the years, but in a stylised way.
It really helps to have an artistic eye for this kind of thing and as a decorative artist that’s something I pride myself on. There are a lot of painters and decorators out there that have paint effects on their list of services, but I have seen very few over the years that can hold their own against a decorative artists portfolio. Painting and art are two very different things, it’s not just about knowing how to create the effect, it’s about getting the colour just right as well as the weight, the balance and the patina.

It’s quite difficult to get a good photo of this kind of subtle paint effect so if you’re struggling to see the full effect I would suggest tilting your screen back a bit….eh voila! 🙂
The Final Protective Coats
The base on which the glaze has been applied is very very durable but the glaze itself is pretty thin so needs some additional protection to ensure it has great durability and is easily wipeable.
The final stage is therefore to seal everything with a protective lacquer. For this I turn to another Tikkurila product, this time Kiva. Kiva is water based and comes in all manor of sheen from 20, 30, 40% through to gloss. For this particular project I actually used the matt version, which actually has around a 10% sheen level.


Thanks for reading my Blog and please scroll down for more photos of this project below.


If you would like to read more detailed accounts about how I go about ‘normal’ hand painted kitchen and re-paint projects please follow the link below to my Blogs page –https://imaginativeinteriors.co.uk/category/blog/kitchens-blog/
Lee works as a specialist painter throughout Yorkshire and is within easy reach for projects in Leeds including Rawdon, Headingly, Holbeck, Chapel Allerton, Horsforth, Roundhay, Burley, Kirkstall, Pudsey, Bramhope, Pool in Wharfdale, as well as Harrogate, Wetherby, Ripon, Wakefield, Halifax and all the surrounding areas.